Campaign stories
A campaign page needs one subject and a visible next step. Show the work, explain what changes in it, then give the reader a route to the product or lesson. A campaign can be generous with images while keeping the reading path short and deliberate.
Lead with the work
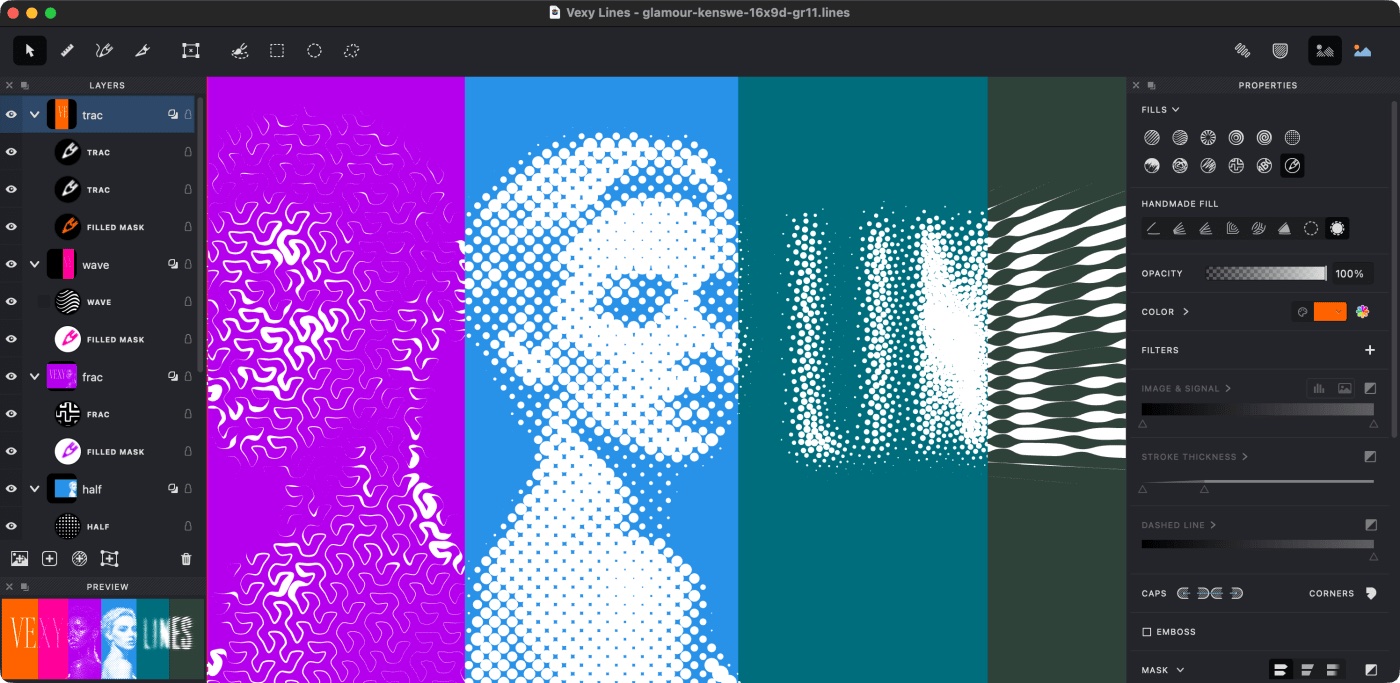
The Vexy Lines source page moves from an image to fills, then to layers and export. This composition keeps that progression while putting the interface beside the opening claim. The source's price and licence language is omitted; readers reach the current offer through the product page.
Vexy Lines
Pixels become lines
Vexy Lines transforms photos and images into scalable vector artwork: engraving lines, waves, halftone dots and letters. You choose the fill and direct the composition with layers, groups and masks.
The app reads tone, edges and shapes, then draws with mathematically defined strokes. The source image gives you the subject; the fill changes how it is drawn.
<div class="fl-feature">
<section>
<p class="fl-source-note">Vexy Lines</p>
<h2 id="pixels-become-lines">Pixels become lines<a class="headerlink" href="#pixels-become-lines" title="Permanent link">¶</a></h2>
<p>Vexy Lines transforms photos and images into scalable vector artwork:
engraving lines, waves, halftone dots and letters. You choose the fill and
direct the composition with layers, groups and masks.</p>
<p>The app reads tone, edges and shapes, then draws with mathematically defined
strokes. The source image gives you the subject; the fill changes how it is
drawn.</p>
<p><a class="md-button md-button--primary" href="https://www.vexy.art/lines/">Explore Vexy Lines</a></p>
</section>
<figure>
<p><a class="glightbox" data-desc-position="bottom" data-height="auto" data-type="image" data-width="auto" href="https://i.vexy.art/vl/landing/home-vexy-lines.jpg"><img alt="A portrait composed in the Vexy Lines workspace" loading="lazy" src="https://i.vexy.art/vl/landing/home-vexy-lines.jpg"></a></p>
<figcaption>The image, line treatment and editing controls share one workspace.</figcaption>
</figure>
</div><div class="fl-feature" markdown="1">
<section markdown="1">
Vexy Lines
{ .fl-source-note }
## Pixels become lines
Vexy Lines transforms photos and images into scalable vector artwork:
engraving lines, waves, halftone dots and letters. You choose the fill and
direct the composition with layers, groups and masks.
The app reads tone, edges and shapes, then draws with mathematically defined
strokes. The source image gives you the subject; the fill changes how it is
drawn.
[Explore Vexy Lines](https://www.vexy.art/lines/){ .md-button .md-button--primary }
</section>
<figure markdown="1">
{ loading="lazy" }
<figcaption>The image, line treatment and editing controls share one workspace.</figcaption>
</figure>
</div>Adapted from www.vexy.art/src_docs/md/lines/index.md, especially its opening,
“Paint with algorithms” and “Inside the studio” sections.
Give the reader a sequence
The next section answers how the work proceeds. Four short stages are enough for a campaign overview. Put exact tool settings in a linked tutorial, where the reader has room to follow them.
1. Bring a source
Start with a PNG, JPEG, TIFF, BMP, SVG or PDF. A photo, sketch or other image supplies the tone and structure that the fill will interpret.
2. Choose a fill
Linear, Wave, Circular and Halftone fills give the same source different rhythms. Choose the treatment that makes the subject readable.
3. Compose the layers
Stack fills, group them and paint masks. A mask lets one treatment appear where you need it while another carries a different part of the image.
4. Export the artwork
SVG, PDF and EPS preserve vector output. PNG and JPEG provide raster copies for the destinations that need them.
<div class="fl-pattern-grid">
<section>
<h3 id="1-bring-a-source">1. Bring a source<a class="headerlink" href="#1-bring-a-source" title="Permanent link">¶</a></h3>
<p>Start with a PNG, JPEG, TIFF, BMP, <abbr title="Scalable Vector Graphics">SVG</abbr> or PDF. A photo, sketch or other image
supplies the tone and structure that the fill will interpret.</p>
<p><a href="https://help.vexy.art/lines/articles/image-overview/">Source images</a></p>
</section>
<section>
<h3 id="2-choose-a-fill">2. Choose a fill<a class="headerlink" href="#2-choose-a-fill" title="Permanent link">¶</a></h3>
<p>Linear, Wave, Circular and Halftone fills give the same source different
rhythms. Choose the treatment that makes the subject readable.</p>
<p><a href="https://help.vexy.art/lines/articles/fills-overview/">Fill overview</a></p>
</section>
<section>
<h3 id="3-compose-the-layers">3. Compose the layers<a class="headerlink" href="#3-compose-the-layers" title="Permanent link">¶</a></h3>
<p>Stack fills, group them and paint masks. A mask lets one treatment appear
where you need it while another carries a different part of the image.</p>
<p><a href="https://help.vexy.art/lines/articles/layers-overview/">Layers</a></p>
</section>
<section>
<h3 id="4-export-the-artwork">4. Export the artwork<a class="headerlink" href="#4-export-the-artwork" title="Permanent link">¶</a></h3>
<p><abbr title="Scalable Vector Graphics">SVG</abbr>, PDF and EPS preserve vector output. PNG and JPEG provide raster copies
for the destinations that need them.</p>
<p><a href="https://help.vexy.art/lines/articles/exporting-the-artwork/">Exporting artwork</a></p>
</section>
</div><div class="fl-pattern-grid" markdown="1">
<section markdown="1">
### 1. Bring a source
Start with a PNG, JPEG, TIFF, BMP, SVG or PDF. A photo, sketch or other image
supplies the tone and structure that the fill will interpret.
[Source images](https://help.vexy.art/lines/articles/image-overview/)
</section>
<section markdown="1">
### 2. Choose a fill
Linear, Wave, Circular and Halftone fills give the same source different
rhythms. Choose the treatment that makes the subject readable.
[Fill overview](https://help.vexy.art/lines/articles/fills-overview/)
</section>
<section markdown="1">
### 3. Compose the layers
Stack fills, group them and paint masks. A mask lets one treatment appear
where you need it while another carries a different part of the image.
[Layers](https://help.vexy.art/lines/articles/layers-overview/)
</section>
<section markdown="1">
### 4. Export the artwork
SVG, PDF and EPS preserve vector output. PNG and JPEG provide raster copies
for the destinations that need them.
[Exporting artwork](https://help.vexy.art/lines/articles/exporting-the-artwork/)
</section>
</div>Close with a useful handoff
The closing section should answer the question left by the demonstration. A reader who wants to understand masks needs a lesson; a reader assessing the app needs product information. Keep those destinations named separately.
Continue the composition
Layers and masks let you combine treatments without asking one fill to describe the whole image. Start with the mask lesson if you want to control where a treatment appears.
<div class="admonition tip">
<p class="admonition-title">Continue the composition</p>
<p>Layers and masks let you combine treatments without asking one fill to
describe the whole image. Start with the
<a href="https://help.vexy.art/lines/articles/adding-a-mask/">mask lesson</a> if you
want to control where a treatment appears.</p>
</div>
<p><a class="md-button" href="https://help.vexy.art/lines/articles/adding-a-layer/">Read the layer guide</a>
<a class="md-button" href="https://www.vexy.art/lines/">View current product information</a></p>!!! tip "Continue the composition"
Layers and masks let you combine treatments without asking one fill to
describe the whole image. Start with the
[mask lesson](https://help.vexy.art/lines/articles/adding-a-mask/) if you
want to control where a treatment appears.
[Read the layer guide](https://help.vexy.art/lines/articles/adding-a-layer/){ .md-button }
[View current product information](https://www.vexy.art/lines/){ .md-button }Both layouts use the guide's field-guide.css. The feature stacks text before
image below 800px; the process grid keeps the four stages in source order.